Friday, 17 February 2017

Cisco Jabber - How to Fix a Slow / Unresponsive Chat Box

Fixing the Unresponsive Chat Box
Sometimes a users chat box within Cisco Jabber can become very unresponsive, this guide is to fix that problem.
Step 1. Go onto the users computer and close Jabber, make sure you close it in Task Manager too.
Step 2. On your computer, click the “Start” button and type in the search box \\COMPUTERNUMBER\c$\Users   **you can use an IP address instead of a computername.

Step 3. Double click the users profile

Step 4. Navigate to the users “History” folder eg: \AppData\Local\Cisco\Unified Communications\Jabber\CSF\History

Now delete the Data Base File.

How to Update Your Outlook Address Book

Open Microsoft Outlook
Step1. Click on the “File” tab
Step 2. Click on the “Account Settings” Button
Step 3. Click on “Download Address Book…”
Step 4. Make sure the box is ticked and “Full details” is selected, click “OK”
A send/receive popup will show, just minimize it.


It can take a while for your Address Book to fully update.

This will automatically happen, however, there are times when a user will need to manually do it.

How To Ping A Computer

Click the start menu and type into the search box: cmd
Type: ping COMPUTERNUMBER or their IP

If you can successfully ping their computer you will get a numbered ms result eg 60ms, if its not successful you will get a unresolved request.
This is very useful because it tells you if you can make a connection with their computer. It is very useful when you can’t connect to a computer through whatever remote access program you have, for instance, if you ping their computer number it will also show their computers IP eg 10.30.41.103, you can then use that IP to connect into their computer.

How To Make A Drive Mapping Program

This is useful because Active Directories auto maps drives based on a user’s group membership, this can be troublesome when they belong to two groups which map want to map to the K: drive.

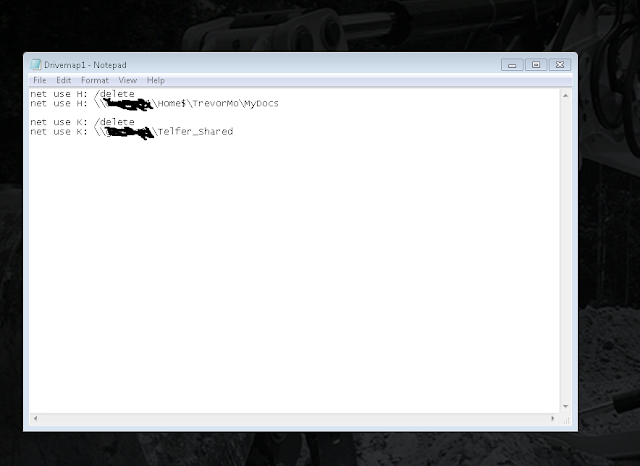
This program will automatically map drives for users, they will simply have to double click the icon. 

Step 1. First of all, open notepad
Step 2. Now you need to chose which drives you want auto mapped then type the following for example: 
net use K: /delete
net use K: \\SERVERNAME\Sydney_Shared
Lastly, make sure when youre done you save it with the extension .bat

The great thing is that you can have it map as many drives as you like, as you can see in the picture.

How to enter another computer through folder view

Entering a computer through folder view can be very useful when you want to add or delete files from their computer.
Click the “Start” button and type in the search box \\COMPUTERNUMBER\C$
** You can put and IP address in if they down have a computername.


Restart A Persons Computer Remotely

You can restart a computer remotely by doing the following:

1. Click the start menu and type CMD then hit enter, you should now be inside of Command Prompt.
2. Type: shutdown -i and hit enter.
3. Click the Add button and add the computers IP to it. Now have a laugh :)


Windows Password Expiry Check

You can check a users password status by doing the following

1. Click your windows start button, and int he search box type CMD, this is also knows as command prompt.
2. enter in the follwing:  net user USERNAME /domain


This will show the the alot of very useful information.

CAT VIMS - Full Install With Fix For Previous Versions Installed

VIMS

VIMS is a Cat application used to display data from trucks. The application is commonly used by field service team members, so it has been included in the field service build.


Installation Information:

Uninstall Guide:
Step 1:  Go to programs and features, then uninstall Vims, DB2 Express and Java.
Step 2:  Go to Control Panel > Administrative Tools > Computer Management. Now expand Local Users and Groups then click on Users and delete the DB2 account.

Step 3:  Navigate to and delete the following folders:
C:\Users\Public\Caterpillar and delete the VIMS3G folder
C:\Users and delete the db2admin folder
          C:\Program Files\IBM and delete the SQLLIB_VIMSPC folder
          C:\ProgramData\Caterpillar delete the VIMS3G folder


Install Guide:

Step 1: If the computer has recently been reimaged, you must make sure all updates have been finished before you start the installation process, you can do this by checking in the “Software Centre” application. This can be found by navigating to the Start Menu > Microsoft System Centre 2012 > Configuration Manager > Software Centre.

Step 2: Install Java 8 51, once that's done, reboot the computer. Now make sure the new Java is installed.
Step 3: Go into the VIMS folder and run the Setup program (the 48kb one).
Step 4:  From the update folder, run the VIMSpc 2015A 5.0.9.0 Update 15.2.2.


Step 5: Enable Vims through the windows firewall, go to Control Panel > Windows Firewall > click on “Allow a program or feature through Windows Firewall” > click on the “Allow another program….” Button > click the “Browse” button. Now manually navigate to the VIMS3G folder and select the VIMS3G program and click the “Open” button, next click the “Add” button. Now make sure “Domain”, “Home/Work” and “Public” are ticked. If this has been done correctly it should look like the picture below, if it does, click the “OK” button. 

SAP Netweaver Business Client - Logon Certificate Removal

Logon Certificate Removal

If the user doesn't explicitly logout the previous day. Then the personal certificate will still be in their certificate store and need to be deleted.

1. Open Internet Explorer. Go To "Tools" (Alt - T) then Internet Options (o)
2. Select the "Content Tab":
3. Click "Certificates"
4. Select the Certificate with your username "PXXXXXX" and click remove:
5. Close All Internet Explorer Windows and login again


SAP Netweaver Business Client - How to Setup Your SAP Password Reset Ability


This is a very quick process which will give users the ability to reset their own sap password.


Step 1: Open Internet Explorer, click the star on the top right corner, then click on IDM Self Service.


Step 2: Click on Change Own Data.


Step 3: Click on the Password Questions tab, answer the questions then click Save.